Beginner video lighting that looks more expensive than your camera
Use a simple, beginner video lighting setup to make your talking head footage look like it was shot on a far more expensive camera body.

Why video lighting matters more than your camera body
For a first-time video lighting setup, light quality matters more than sensor specs. A well placed key light will do more for your talking head video than a new camera body with extra resolution and complicated autofocus modes. In practice, a softly shaped main light and controlled light intensity can make an older mirrorless camera look surprisingly professional.
Think of light as your real lens, because highlights and shadows sculpt your face and define how expensive your gear appears on screen. When you raise the brightness of a single LED light and angle it correctly, your skin texture, eye catchlights, and background separation all improve in a way no codec or frame rate can match. That is why a carefully tuned beginner lighting rig often beats a careless multi-light studio setup that sprays harsh light sources everywhere.
Many new creators obsess over camera reviews and ignore how their room actually handles light. Yet a simple LED panel placed at 45 degrees, combined with a neutral wall as a reflector, will usually outperform a bare tube light pointed straight at your face from the front. When you learn to control lighting instead of chasing bodies, you stop fighting noisy shadows, weird color temperature shifts, and inconsistent white balance in every clip.
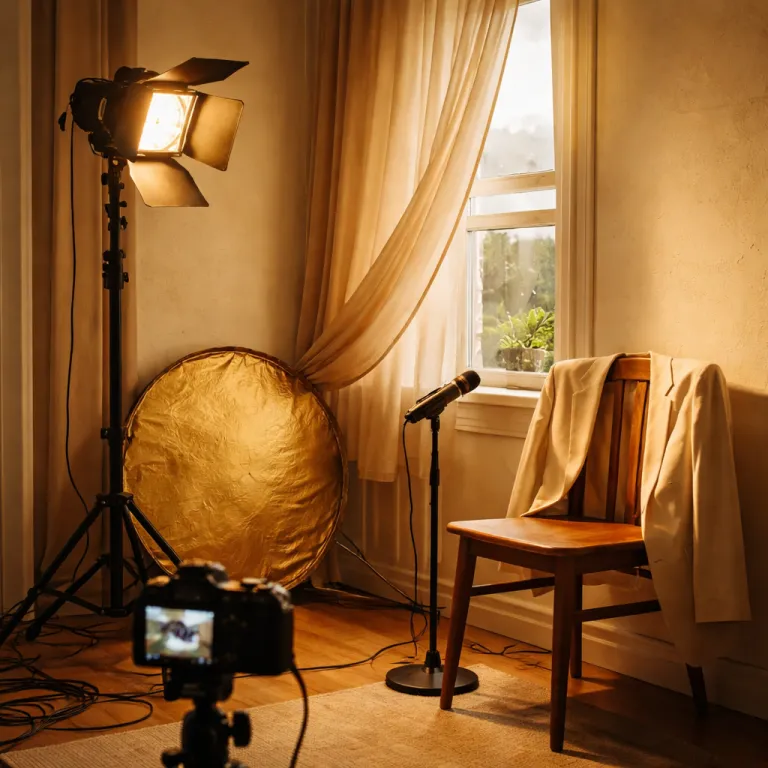
One key light and a window: the 80 percent solution
The heart of any basic YouTube lighting kit is a single key light placed about 45 degrees off to one side of your face and slightly above eye level. This primary light source can be a small LED panel, a compact softbox, or even one of the better portable lighting kits that use diffused LEDs with adjustable brightness. The goal is simple: you want soft, directional light that wraps around your features while leaving a gentle shadow on the far cheek.
Now add a window on the opposite side, and you have a free fill light that smooths contrast without killing depth. On overcast days the window light is naturally diffused, so your talking head video looks flattering with minimal effort and almost no extra gear beyond that one LED light. When the sun is direct, step back from the glass, close sheer curtains, and let the fabric turn harsh light sources into a larger, softer panel.
For creators relying on modern autofocus, pairing this simple one-light video approach with a body that tracks faces reliably matters more than chasing the newest AI features. If you are wondering whether advanced subject tracking really helps once your scene is well lit, a detailed analysis of AI autofocus for better videos can clarify how stable lighting makes every algorithm more consistent. With this balanced mix of natural light and controlled LED lighting, your camera does not need to work as hard, and your exposure, white balance, and overall image quality stay predictable from take to take.
Color temperature, white balance, and avoiding strange skin tones
A strong beginner lighting layout does not just think about brightness; it respects color temperature and white balance. Color temperature describes how warm or cool a light appears, measured in kelvins, and it explains why some LED lights look orange while others feel icy blue. As a reference, tungsten-style lamps sit around 2700K–3200K, while daylight-balanced LEDs and window light are usually near 5000K–5600K. When you mix a warm tube light with a cool daylight window and a neutral LED panel, your camera struggles to decide what skin tone is correct.
The fix is to choose one dominant color for your key light, then match everything else to it as closely as possible. If your window is the main light source, set your LED light to a daylight preset around 5500K, avoid wildly saturated RGB effects on your face, and lock your camera white balance to a manual daylight value instead of auto. When you rely on RGB accents, keep them in the background as creative practicals or camera lights, not as primary illumination on your skin, because that ruins professional looking color and makes grading harder.
Most portable lighting kits now offer variable color temperature and dimmable light intensity, which is ideal for small rooms. You can warm the LED lighting slightly to around 4000K for a cozy talking head, cool it closer to 5600K for a clean tech look, and always keep your white balance fixed so your video does not shift mid sentence. If you also use a wireless mini microphone for clean audio, as tested in many content creator microphone reviews, this combination of stable light and sound makes even budget gear feel premium on screen.
Budget friendly gear tiers for your first lighting kit
When you build your first video lighting kit, start with a realistic budget and clear expectations. At the lowest tier, around the price of a basic accessory, a clip on ring light can lift your laptop or phone video from unusable to acceptable, especially for quick talking head updates. These small lights are highly portable, but their tiny light sources create harder shadows and flatter photography than a larger LED panel.
Step up slightly in price and you reach compact LED panel lights from brands like Neewer or Viltrox, which usually include adjustable brightness and color temperature. Mounted on a light stand and bounced off a wall, one of these panels becomes a surprisingly professional single-source key light for YouTube lighting in a bedroom or home office. Many kits even advertise free shipping, but focus more on build quality, consistent color, and usable controls than on marketing claims about endless RGB modes.
At a higher but still accessible tier, small smart fixtures such as the Aputure MC offer precise control through an app, full RGB effects, and excellent color accuracy. One of these units can act as a key light at close range, or as a background accent that adds depth behind your subject in a tight studio corner. Whatever tier you choose, remember that a single reliable LED light, placed well, beats a bag of mismatched gear that you never quite learn to use.
Background separation, depth, and real world room setups
A thoughtful beginner video lighting setup does more than light your face; it shapes the whole frame. Background separation is the art of making you stand out from the room, and it starts by pulling your chair at least one metre away from the wall behind you. Once you have that distance, a small LED light or portable lighting cube aimed at the background can create a subtle pool of brightness that frames your silhouette.
In a cramped bedroom studio, I often place the key light at 45 degrees, the window on the opposite side, and a tiny RGB accent behind the subject aimed at a plant or shelf. This third light source does not need much intensity, but it adds layers to the video and makes even modest camera gear feel more cinematic. If you are planning to be a guest photographer or casual videographer at a family event, the same principles of separation and controlled light intensity apply, and a practical guide to real world gear and game plans can help you adapt this setup outside the home.
Do not forget that your camera position, lens choice, and aperture also influence how the lights behave. A wider lens shows more of the room, so you must control lighting across a larger area, while a tighter portrait focal length lets you keep the kit simple and focused. Over time you will learn how small shifts in light placement, brightness, and color temperature change the mood of your talking head, and that knowledge will outlast any single camera body you own.
Frequently asked questions about your first video lighting setup
How bright should my key light be for a talking head video?
For a basic beginner lighting setup, your key light should be bright enough that your camera can expose at around ISO 400 to 800 with a shutter speed near your frame rate and a moderate aperture. For example, at 25 or 30 fps you might aim for 1/50 or 1/60 of a second at f/2.8 to f/4, which usually means running a small LED panel at roughly 30 to 60 percent brightness when it sits about one metre from your face. If your camera is forced to use very high ISO values, increase light intensity or move the light closer instead of accepting noisy footage.
Can I use only window light for professional looking YouTube lighting?
You can absolutely shoot a talking head video with only window light if you control the conditions. Sit close to a large window on an overcast day, turn your body about 45 degrees to the glass, and avoid mixing other light sources with different color temperature values. When the sun is harsh, diffuse it with curtains or a thin sheet, and lock your camera white balance to a daylight preset around 5200K so your skin tone stays consistent.
Do I really need RGB lights in my first lighting kit?
RGB fixtures are optional for a first video lighting kit, because they mainly add style rather than core visibility. A neutral key light with adjustable brightness and color temperature will do far more for your overall video quality than saturated background effects. Once you are comfortable with basic LED lighting and white balance control, you can add RGB camera lights behind you to create subtle color accents on walls or props.
What is the best portable lighting option for creators who travel a lot?
For frequent travellers, a compact LED panel with an internal battery offers the best balance of size, power, and control. Look for models that allow fine tuning of light intensity and color temperature, mount on a small stand or cold shoe, and fit easily into a camera bag. These portable lighting panels can act as a key light in hotel rooms, a fill light outdoors at dusk, or a quick background accent when you need depth in unfamiliar spaces.
How do I avoid flicker when using LED lights in my videos?
To avoid flicker in a beginner video lighting setup, match your camera shutter speed to your local mains frequency and use quality LED lights designed for video. In many regions that means choosing shutter speeds like 1/50 or 1/100 of a second at 25 or 50 fps, which sync better with the electrical cycle. Cheap gear sometimes cuts corners on electronics, so reading detailed user reviews and testing your lights at your usual frame rate before an important shoot is essential.