Get your camera spring ready before the first photo session
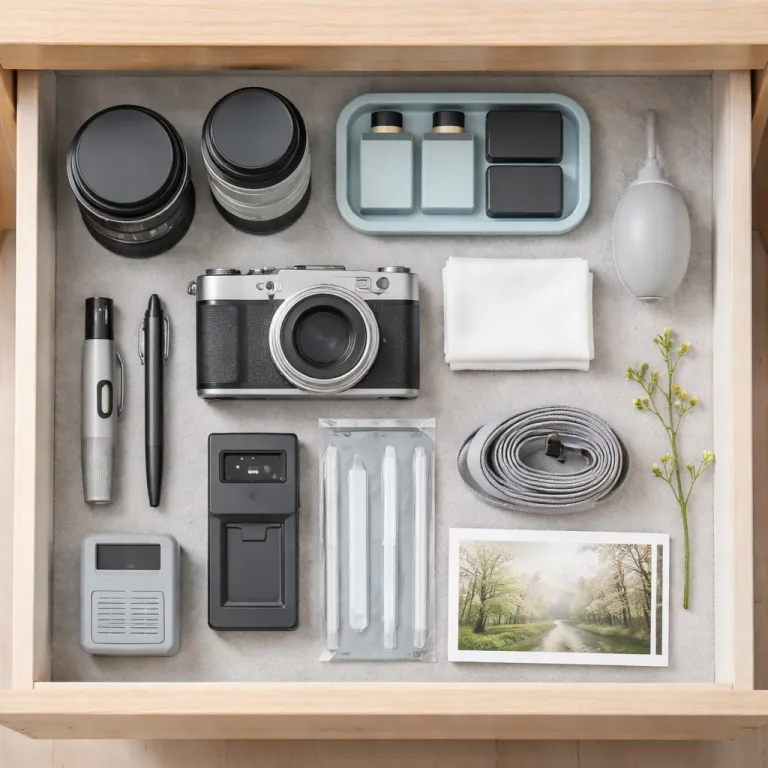
Spring rewards preparation, so start with a simple gear audit. This is the perfect time of the year to check every battery, card, and lens before your first spring photography walk. A few calm minutes now will help you avoid missed photos when the weather warms and the light finally turns kind.
Look at your sensor first, because dust ruins otherwise eye catching images. Point your digital camera at a plain bright wall, stop down to f/16, and photograph it at a mid range shutter speed to reveal spots that early spring wind may have blown inside. If you see dark blobs in the photo or in several test photos, use a hand blower once, then book a professional wet clean at a camera shop if the marks stay.
Next, inspect lenses for haze, fungus, and corrosion around the contacts that carry autofocus and stabilization data. Clean the front and rear glass gently, then photograph a distant subject to confirm sharpness and contrast across the frame in both single photo and burst photos. If autofocus hunts or the images look soft even at fast shutter speed settings, your spring photography plans may need a service visit before the season really starts.
Memory cards age too, and this is the right time to format them in camera. Back up any important family photos, then run a full format and shoot a short burst to confirm write speed is stable for your style of photography. A reliable card will help your camera keep up when people move quickly during a spring family picnic or when cherry blossoms fall in a gust of wind.
Check batteries, firmware, and basic settings for spring landscapes
Cold months are hard on lithium batteries, so test each one before a long spring photoshoot. Charge them fully, then leave the camera powered on and photograph normally until it shuts down, noting the time and number of photos captured. Any battery that dies far earlier than the others during this time of the year should be marked as backup only for casual photography.
While you are in maintenance mode, update firmware, because manufacturers quietly improve autofocus and stability over time. Visit the support page for your camera brand, download the latest firmware, and follow the instructions carefully so the process will help your autofocus track people, pets, and birds more confidently in changing spring light. If you are still choosing the best camera for expressive landscape photography, check how often each brand issues firmware that meaningfully improves real world performance rather than just adding niche features.
Once the camera brain is current, reset or review key settings that shape your spring photography experience. Set the date and time correctly, choose RAW or RAW plus JPEG depending on how much you like to edit, and pick a neutral color profile so the camera does not oversaturate the natural colors of flowers and foliage. A calm, realistic color palette in camera gives you more flexibility later when you want to emphasize the beauty of spring without turning greens and pinks into cartoonish vibrant colors.
Finally, create a simple custom mode for landscape and nature photography during this season. Use aperture priority, auto ISO with a sensible ceiling, and a minimum shutter speed that freezes gentle movement in leaves while keeping noise under control. Saving this setup means one twist of the dial will place you in a reliable baseline for every spring family hike, sunrise sunset outing, or quick photo session in the park.
Use spring light, color, and lenses to shape expressive landscapes
Light defines every photograph, and spring light is unusually forgiving for new photographers. As the weather warms, the sun sits lower for longer, giving you extended golden hour windows where landscapes glow and people look relaxed rather than squinting. Plan your time photos around these periods, because the soft light will help you manage contrast and color more easily than harsh midday sun.
For landscape photography, early morning and late evening are your best teachers. Aim to arrive on location during early spring at least thirty minutes before sunrise sunset, so you can watch how the color of the sky shifts and how shadows carve depth into hills, trees, and buildings. This slow observation will help you understand how to place the sun in your frame, whether you want backlit cherry blossoms, side lit family portraits, or front lit scenes with even colors and gentle contrast.
Lenses matter, but you do not need a huge collection to photograph the beauty of spring effectively. A basic wide angle zoom around 18–55 mm on an APS C body or 24–70 mm on full frame will cover most spring photography needs, from broad landscapes to tighter spring family portraits under blooming trees. If you want to refine your gear choices, study a guide to choosing the perfect lens for capturing stunning landscape photos, then rent before you buy so real sessions, not spec sheets, shape your decision.
Pay attention to how your lens renders color and contrast when you photograph flowers, grass, and sky together. Some lenses produce slightly warmer colors, which can flatter skin tones and enhance the natural color palette of spring scenes, while others lean cooler and emphasize crisp detail in distant mountains or city skylines. Whichever lens you use, keep your aperture around f/8 for landscapes to balance sharpness and depth, then open wider for a single eye catching flower or a shallow depth of field portrait that isolates people against soft, vibrant colors in the background.
Practice projects that turn spring outings into better photos
Once your gear is ready, the real progress comes from shooting often, not from reading more photography tips. Set yourself a thirty day challenge where you photograph something related to spring every single day, even if it is just a single photo of changing light on your street. This daily habit will help your eye notice subtle shifts in color, shadow, and composition that occasional weekend sessions simply do not reveal.
Use flowers as your macro classroom, because they sit still and reward patience. Start with a single bloom, then step back to include several flowers, then an entire bed, paying attention to how the background colors and shapes either support or distract from your main subject. Over time, you will learn how to position yourself so that the beauty of spring fills the frame without messy elements near the edges pulling attention away from the central photograph.
Dedicate separate days to specific themes like nature photography, family moments, and urban details. One evening, focus only on spring family interactions in a park, watching how people move through the frame and how changing light affects skin tones and clothing colors. Another day, work on landscapes using scenery photography tips for creating expressive landscape images, then review your images to see which compositions feel balanced and which feel cramped or empty.
Finally, treat each outing as a mini photo session with a clear goal rather than a vague walk. Decide whether you are chasing an eye catching reflection at golden hour, a series of cherry blossoms against a blue sky, or candid photos of people enjoying the season, then adjust your shutter speed, aperture, and framing to serve that idea. Over this time of the year, these focused projects will help you build a personal library of spring photoshoot images that reflect not just the season, but the way you see the world when the light returns.
FAQ
What camera settings work best for spring landscapes at golden hour ?
For spring landscapes during golden hour, start with aperture priority at around f/8, auto ISO capped near ISO 1600, and a minimum shutter speed of 1/125 s to keep handheld images sharp. If trees or grass move in the wind, raise the minimum shutter speed to 1/250 s and let ISO climb a little higher to protect detail. Use exposure compensation to keep bright clouds from blowing out, dialing in minus 0.3 to minus 1 stop as needed.
How do I photograph cherry blossoms without washed out colors ?
To photograph cherry blossoms with rich color, avoid shooting under harsh midday sun and aim for early morning or late afternoon when the light is softer. Expose slightly darker than the camera meter suggests, then check the histogram to ensure the highlights are not clipped. Use a neutral or flat color profile in camera, then add contrast and saturation gently in editing so the blossoms stay delicate rather than artificial.
What is the best way to capture both people and scenery in spring ?
When you want both people and scenery in a spring photograph, step back and use a slightly wider focal length, such as 24–35 mm on full frame or 16–24 mm on APS C. Set your aperture around f/5.6 so faces stay sharp while the background remains recognizable but not distracting. Position your subjects off center using the rule of thirds, and watch for leading lines like paths or fences that guide the viewer through the frame.
How can I keep my spring photos sharp when shooting handheld ?
To keep handheld spring photos sharp, use a shutter speed at least equal to the reciprocal of your focal length, such as 1/100 s at 100 mm, and faster if your subjects move. Turn on image stabilization if your lens or camera body offers it, and brace your elbows against your body while gently squeezing the shutter. In low light, raise ISO rather than letting the shutter speed drop too far, because a slightly noisy sharp image is more usable than a clean but blurry one.
How do I choose a color palette for editing spring images ?
When editing spring images, start by deciding whether you want a soft pastel color palette or a more saturated look with vibrant colors. Adjust white balance first to keep greens natural rather than neon, then fine tune saturation and luminance for individual colors like pink, yellow, and green. Keep skin tones believable if people appear in the frame, even if that means slightly muting the background to maintain a cohesive, realistic feel.