Manual mode camera beginners guide: learn control without the stress
Your first real camera probably feels heavier than your phone. It also carries more decisions, because every manual setting will change how the light hits the sensor. This beginner-friendly manual shooting guide exists so each photo will look intentional, not accidental.
Think of the camera as a simple box that controls light with three dials. Shutter speed decides how long the box stays open, aperture decides how wide the opening is, and ISO decides how sensitive the sensor becomes to that light. Together they form the exposure triangle, and understanding this triangle turns random shooting into deliberate photography.
On most cameras you will see a mode dial with letters like P, S, Tv, A, Av, and M. Those letters control how much help the camera settings give you, from full automation to full manual mode control. This beginner guide treats manual as a tool, not a badge of honor, because the right mode depends on the scene and your stress level.
When you twist that dial to M, you are telling the camera that you will choose shutter, aperture, and ISO yourself. The camera still meters the scene and shows you an exposure scale, but you decide how to balance the exposure triangle. That balance shapes motion, background blur, and how clean or noisy the final image looks.
If you are choosing your first body, even an entry level mirrorless camera like a Canon EOS R50 or a Nikon Z 30 gives you direct access to every setting. Premium compact cameras can do the same, and a good premium compact camera guide helps you find one with a proper mode dial. Whatever you buy, the goal is identical, because shooting in manual is about understanding how every control affects the final photo.
The exposure triangle in plain language: shutter, aperture, ISO
Start with shutter speed, because motion is what most beginners notice first. A fast shutter like 1/1000 second freezes a running child, while a slow shutter such as 1/15 second lets motion blur streak across the image. Those different shutter speeds change not only sharpness but also how much light reaches the sensor.
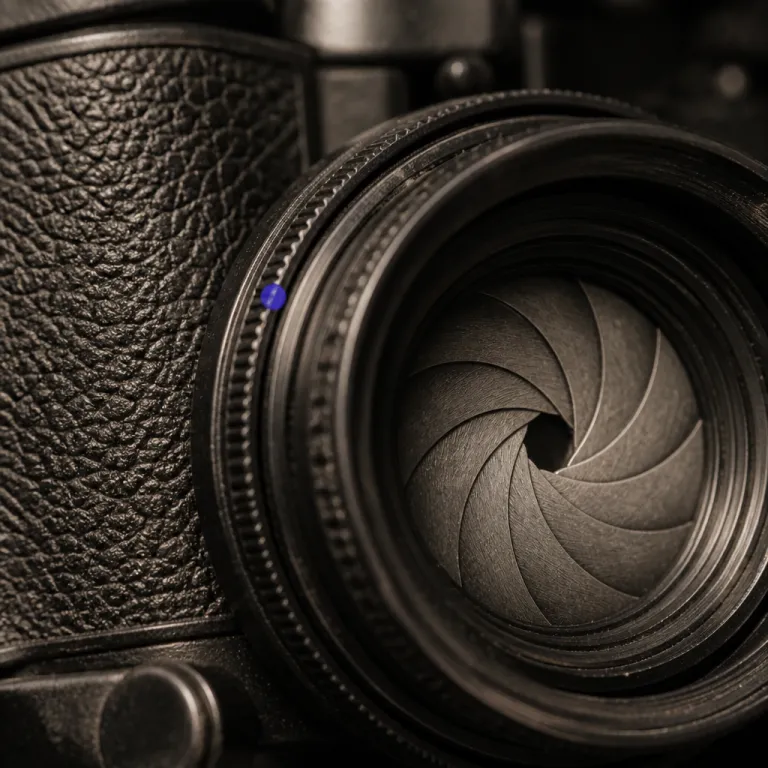
Next comes aperture, which is the adjustable opening inside the lens that controls both brightness and depth. A wide aperture like f/1.8 lets in more light and creates shallow depth of field, so the subject stays sharp while the background melts into blur. A narrow aperture such as f/11 reduces light but increases depth, keeping more of the scene in focus from front to back.
ISO is the third corner of the exposure triangle, and it behaves like a brightness tax. Low ISO values such as ISO 100 keep your photo clean, while high ISO values such as ISO 6400 brighten the exposure but add visible noise to the image. In low light you often raise ISO to avoid a slow shutter, but you always pay with grain and reduced detail.
When you change one side of the triangle, you must adjust another side to keep the same exposure. If you double the shutter speed to freeze motion, you either open the aperture or raise ISO by one stop to compensate. Thinking in simple plus one or minus one steps keeps manual mode from feeling like math, because every move has a clear trade off.
Priority modes sit on top of this triangle and automate only what you ask. Aperture priority lets you choose the aperture and ISO while the camera picks shutter speed, and shutter priority does the opposite by locking in shutter speed while the camera adjusts aperture. Priority mode options are not training wheels, they are fast tools that still respect your creative control over depth, motion, and noise.

Manual, aperture priority, or shutter priority: choosing the right mode
Manual mode shines when the light stays consistent and you want repeatable results. In a home studio, during a portrait session, or when recording video, you set shutter speed, aperture, and ISO once, then shoot without the camera second guessing you. That stability keeps every photo and frame matching, which makes editing easier and more predictable.
For walking around a city or hiking a trail, aperture priority usually makes more sense. You decide the aperture to control depth of field, the camera chooses shutter speed, and you keep an eye on ISO so the exposure triangle stays balanced. This semi automatic mode keeps your background blur consistent while the camera reacts quickly to changing light.
Shutter priority earns its place when motion is the story. If you are shooting sports, kids on swings, or dogs running at the beach, you pick a fast shutter to freeze action and let the camera adjust aperture and ISO. In low light you might accept a slower shutter to avoid pushing ISO too high, but shutter priority still keeps motion at the center of every decision.
Priority mode choices are not a hierarchy where manual sits at the top as the only serious option. Instead, think of manual, aperture priority, and shutter priority as three tools in one bag, each tuned to a different kind of shooting. The most helpful beginner manual mode tutorials teach you when to switch modes, not just how to stay in one setting forever.
Whatever mode you use, protect your gear so it can keep teaching you. A simple lens cap or a dedicated accessory such as a Canon lens cover for daily protection prevents scratches that would soften focus and reduce contrast. Good habits around handling and storage matter as much as knowing where the mode dial sits.

A weekend exercise to learn manual mode without math anxiety
Set aside one afternoon with your camera and a simple scene. Place a friend or an object near a window, because that steady light makes exposure changes easier to see. This step by step practice plan works best when you repeat the same photo while changing only one setting at a time.
First, switch to full auto and take a reference photo, then note the shutter speed, aperture, and ISO that the camera chose. Next, turn the dial to manual mode and dial in those same camera settings, then shoot again and compare the two images on the rear screen. You will see that auto is not magic, because shooting manual with identical values produces the same exposure.
Now start playing with the exposure triangle in deliberate steps. Halve the shutter speed and watch the image brighten, then close the aperture by one stop to keep the exposure similar while changing depth of field. Raise ISO by one stop and speed up the shutter to see how speed ISO combinations affect both motion blur and noise.
Repeat the exercise in low light, such as a living room with only a lamp on. Try a slow shutter to keep ISO low, then compare that to a fast shutter with higher ISO and notice how the background changes from clean to grainy. Long exposure attempts on a tripod will show how slow shutter choices turn moving cars into light trails while static objects stay sharp.
On the second day, practice aperture priority and shutter priority with the same scene. In aperture priority, walk the aperture from wide to narrow and watch how shallow depth becomes deep focus as the camera adjusts shutter speed. In shutter priority, lock in a fast shutter for sharp action, then a slow shutter for intentional blur, and feel how each priority mode supports a different creative decision.
Quick weekend checklist (save or print): 1) Choose one simple scene near a window. 2) Take an auto reference shot and write down shutter, aperture, and ISO. 3) Match those settings in manual and compare. 4) Change only shutter for five frames. 5) Reset, then change only aperture for five frames. 6) Reset, then change only ISO for five frames. 7) Repeat the whole sequence in low light. This checklist doubles as a one page PDF practice plan you can keep in your camera bag.

Practical starting settings for five everyday situations
Use these starting points as a pocket beginner guide, not as rigid rules. For an outdoor portrait, set aperture around f/2.8, shutter speed near 1/250 second, and ISO at 100, then adjust until the exposure triangle gives you a bright but not clipped image. That combination creates shallow depth of field so the background softens while the subject remains in crisp focus.
For a landscape, flip into aperture priority and choose f/8 or f/11 to maximize depth of field. Let the camera pick shutter speed, raise ISO only if the shutter becomes too slow to hand hold, and check that distant details remain sharp from edge to edge. Here the priority is depth and clarity, so you accept slower shutter speeds as long as the camera stays steady.
Indoor events demand a different balance between shutter, aperture, and ISO. Start in shutter priority around 1/160 second to freeze people, open the aperture as wide as your lens allows, and let ISO climb until the exposure looks right on the histogram. In this kind of low light, the exposure triangle leans heavily on ISO, and the photo will show some grain, which is better than motion blur.
For pets or kids running in a yard, use manual mode or shutter priority with a fast shutter around 1/1000 second. Pair that with a moderately wide aperture such as f/3.5 and adjust ISO so the image stays bright without clipping highlights. When you need more reach or video flexibility, a dedicated device such as a 6K camcorder with manual controls can complement your stills camera.
Finally, for sunsets or city lights, mount the camera on a tripod and experiment with long exposure techniques. Use manual mode with ISO 100, aperture around f/8, and a slow shutter of several seconds, then lengthen or shorten the exposure until the sky glows without losing color. Over time you will stop thinking about numbers and start thinking about the story each exposure tells, because the best camera is not the megapixel count, but what you will still shoot with in five years.
| Scenario | Mode | Shutter | Aperture | ISO | Notes |
|---|---|---|---|---|---|
| Outdoor portrait | Manual / A | 1/250 sec | f/2.8 | ISO 100 | Blurred background, sharp subject |
| Landscape | Aperture priority | Auto | f/8–f/11 | ISO 100–400 | Maximum depth of field |
| Indoor event | Shutter priority | 1/160 sec | Widest available | ISO 1600–6400 | Freeze people, accept some grain |
| Kids or pets running | Manual / S | 1/1000 sec | f/3.5 | ISO 400–1600 | Fast action, moderate blur in background |
| Sunset or city lights | Manual + tripod | 2–10 sec | f/8 | ISO 100 | Rich color, smooth light trails |
FAQ
Is manual mode really better than auto for beginners ?
Manual mode is not automatically better, but it teaches faster. Auto hides the relationship between shutter speed, aperture, and ISO, while manual mode forces you to see how each change affects exposure. Once you understand that relationship, you can use auto or priority modes more intelligently.
What shutter speed should I use to avoid blurry photos ?
A simple rule is to keep shutter speed at least as fast as 1 over your focal length. With a 50 millimetre lens, aim for 1/50 second or faster, and with a 200 millimetre lens, try 1/200 second or faster. If light is low, raise ISO or open the aperture rather than letting the shutter drop too far.
How do I get a blurry background in portraits ?
To blur the background, use a wide aperture like f/1.8 or f/2.8 and move your subject away from whatever is behind them. Stand closer to your subject, focus carefully on the eyes, and keep ISO low enough to maintain image quality. Aperture priority mode makes this easier because you lock in the aperture and let the camera handle shutter speed.
Why are my indoor photos so noisy ?
Indoor photos often look noisy because the camera raises ISO to compensate for low light. High ISO values brighten the exposure but add grain and reduce detail, especially in shadows. To reduce noise, add more light, open the aperture wider, or use a tripod so you can choose a slower shutter with lower ISO.
Do I need a tripod to learn long exposure techniques ?
A tripod is strongly recommended for long exposure work, because even tiny movements blur the entire frame at slow shutter speeds. You can brace the camera on a table or wall in a pinch, but a stable tripod gives you more consistent results. Once the camera is steady, you are free to experiment with creative shutter times without worrying about handshake.