How to know your sensor is dirty, not just your lens
Your camera starts showing mysterious dark spots in bright skies, and you wonder how to clean camera sensor at home without breaking anything. Those marks usually come from dust sitting on the sensor, not from a smudge on the front element of your lens or a fingerprint on the viewfinder glass. Learning to tell the difference between a dirty sensor and a dirty lens camera setup will save you time, stress, and money.
Start with a simple test that every beginner can repeat with any cameras. Mount a normal lens, set the aperture to around f/16, then point the camera at a plain white wall or bright cloudy sky and slightly defocus the lens so texture disappears. Take several images while slowly panning, because this method helps reveal sensor dust as fixed spots that stay in the same place from frame to frame.
Open the test images on a large screen and zoom to 100 percent to inspect them. If you see small, soft edged grey spots that never move between frames, your sensor will almost certainly need cleaning rather than a quick wipe of the front glass. When the spots shift position as you pan, the problem is usually on the lens or filter, so a careful clean of the front element may remove the marks without any sensor cleaning at all.
Viewfinder dirt behaves differently from sensor dust and often confuses new photographers. If you see specks while composing but they never appear on the final images, the contamination sits on the mirror or focusing screen in a DSLR, not on the sensor itself. In that case you should avoid touching the mirror or screen, because they scratch easily, and focus instead on keeping the lens mount area and rear lens cap clean to prevent new particles entering the system.
Dry sensor cleaning at home with a blower, safely
Once you have confirmed the sensor is dirty, the safest first step is dry cleaning with a hand blower. This method uses air pressure to remove loose dust without any direct contact with the sensor surface, which keeps risk low for beginners learning how to clean camera sensor at home. Done correctly, a blower session will improve most cameras in minutes and often avoids the need for wet tools.
Charge your camera battery fully, then enter the sensor cleaning menu and select the manual cleaning option so the shutter stays open. On a DSLR the mirror will flip up and lock, exposing the sensor behind it, while on a mirrorless camera the sensor sits right behind the lens mount with no mirror in front. Remove the lens, place a clean rear cap on it, then hold the camera with the mount facing down so gravity helps dust fall away from the sensor rather than deeper into the system.
Insert the blower tip just inside the mount without touching anything, and be very careful not to bump the sensor frame. Give ten to fifteen firm squeezes, aiming the airflow across the surface from different angles, because this pattern helps remove particles from corners where they like to hide. Never use canned air, since its propellant can spit liquid onto the sensor and leave stubborn spots that require aggressive sensor cleaning later.
After the blower session, power the camera off to close the shutter, remount the lens, and repeat the white wall test images at f/16. Many specks will vanish after this simple step, especially if the dust was fresh and dry. If you still see obvious spots in the same places, the sensor will probably need a wet method, but you have already reduced the amount of contamination and made the next phase easier.
If you are nervous about buying gear, renting a proper blower and lens camera cleaning kit for a weekend through a service that offers a Lensrentals promo code can be a smart, low cost trial. This approach lets you test different tools on your own camera system before committing to a full kit. You will quickly see how much a simple blower can improve your images by removing dust before it ever reaches the sensor.
Wet cleaning with swabs when dust will not budge
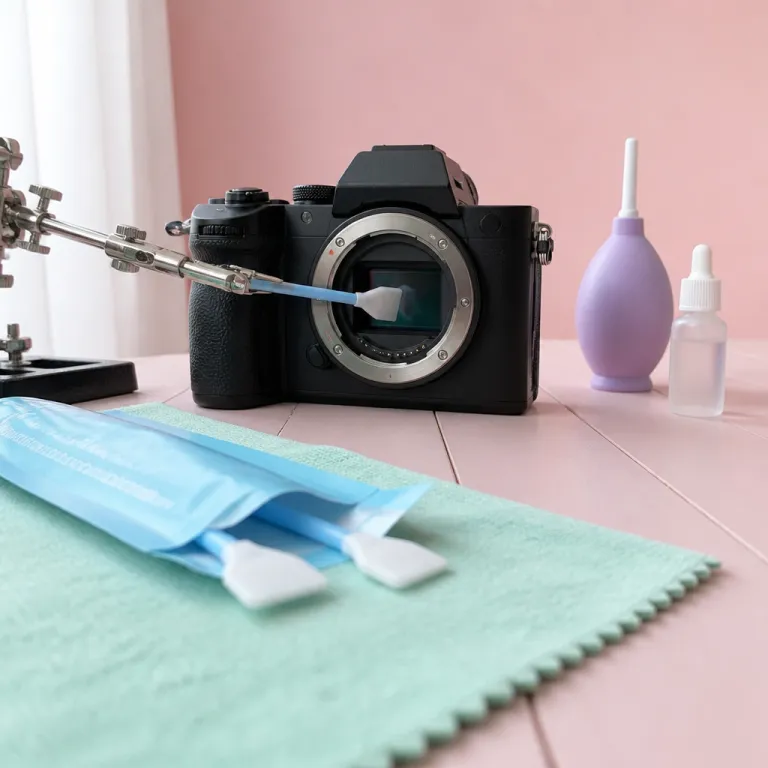
Stubborn spots that survive blower cleaning usually come from sticky dust, pollen, or tiny oil droplets, and these require a wet method. This is the part of how to clean camera sensor at home that scares most beginners, because it involves direct contact with the sensor cover glass using a swab and cleaning fluid. Handled with care and the right tools, though, wet sensor cleaning is routine maintenance rather than a risky surgery.
Buy swabs that match your sensor size exactly, such as full frame, APS C, or Micro Four Thirds, because a mismatch can leave streaks or miss the corners. Use a reputable sensor cleaning solution designed for coated glass, and never substitute household cleaners or lens wipes, which may contain additives that leave residue. Place your camera in the manual cleaning mode again, remove the lens, and keep the front of the mount facing down to limit new dust entering the system while you work.
Apply one or two small drops of solution to the edge of a fresh swab, just enough to dampen it without dripping. Starting from one side of the sensor, press the swab gently and sweep in a single smooth motion across to the other side, then flip the swab and repeat the motion back, so each edge only touches the glass once. Do not reuse swabs, because dried particles on the fabric can scratch the sensor cover and create permanent marks that no amount of cleaning will remove.
After the swipe, exit the cleaning mode, remount the lens, and shoot another f/16 test series to check for remaining spots. A few faint marks may need a second pass with a new swab, but avoid chasing microscopic imperfections that never show in real world images. If you still see large, irregular spots or smears that refuse to shift, the contamination may be oil from the shutter mechanism, and that is the point where a professional service centre is the safer option.
Wet cleaning becomes especially relevant when you prepare for critical events, such as acting as a backup shooter and following a wedding photography game plan. In those situations, a clean sensor will protect your images from distracting marks in bright dresses, pale skies, and smooth walls. Spending ten minutes on a careful sensor cleaning session before the event can save hours of retouching later.
Managing risk, when not to DIY, and how often to clean
Direct contact with the sensor cover glass always carries some risk, so understanding the limits of how to clean camera sensor at home is part of being a responsible photographer. The main dangers are scratching the glass with a dirty swab, leaving streaks from too much solution, or pushing dust into the edges where it becomes harder to remove. You reduce all three risks by working slowly, using fresh tools, and stopping when your images look clean at normal viewing sizes.
There are clear signs that a camera should go to a service centre instead of your kitchen table. If you see large, dark, irregular blobs that look oily, or if the spots form repeating patterns that suggest lubricant splatter from the shutter, home cleaning may only smear the contamination around the sensor. Likewise, if the camera has visible damage around the mount, a loose filter stack, or a cracked low pass filter, any contact cleaning could worsen the problem and void the warranty.
Frequency depends heavily on where and how you shoot, not on a fixed calendar. A studio photographer who rarely changes lenses and keeps a front cap on between sessions might go many months without needing sensor cleaning, because little dust enters the system. Someone who swaps lenses on a windy beach or dusty trail every weekend will probably see new spots after each trip, and a quick blower session followed by occasional wet cleaning will keep images clear.
Think about your own habits with lenses, bags, and storage. If you often leave a lens camera combination uncapped on a table, dust will settle on the rear element and migrate toward the sensor every time you mount it. Building a simple routine, such as always fitting a cap before you move, wiping the front and rear glass with a dedicated cloth, and giving the mount area a blower puff, will improve cleanliness across the whole system.
When planning gear for landscape work or travel, pairing a reliable wide angle lens with a disciplined cleaning routine matters as much as the optics themselves, and guides such as this explanation of landscape lenses and focal lengths can help you think about the full system. A clean sensor will let those lenses show their true sharpness from corner to corner. Dust spots, by contrast, will draw the eye away from the scene you worked so hard to frame.
Practical habits that keep your sensor clean longer
Good habits reduce how often you need to perform deep sensor cleaning and make every session easier. Start with how you change lenses, because that is the main moment when dust enters the camera system and eventually lands on the sensor. Turn the camera off first, since powering down reduces static charge on the sensor cover glass, then point the mount downward and work quickly but careful with both caps and lenses.
Keep a small blower in your bag and use it before mounting any lens, giving the rear element and mount area a few puffs to remove loose particles. Wipe the front glass only with a clean microfiber cloth, and store that cloth in a sealed pouch so it does not pick up grit that could scratch the lens. Avoid setting cameras face up on dusty tables, because the open front of the mount or the exposed front element becomes a landing pad for airborne dust that sensor cleaning later must remove.
Inside your bag, use dividers to keep bodies and lenses separated, and close the zips fully when you walk through sand, snow, or crowded streets. If your camera gets splashed with sea spray or rain, dry the exterior first, then inspect the lens mount and caps before opening anything, since salt crystals can migrate inside and create stubborn spots on the sensor. For mirrorless cameras, which expose the sensor directly when the lens is off, these small steps will dramatically improve long term cleanliness.
Remember that the goal is not a laboratory clean sensor, but images that look clear at the sizes you actually share and print. A few microscopic specks that only appear at f/22 on a blank wall will not ruin portraits, travel scenes, or family photos, so do not obsess over perfection. What matters is a repeatable method that lets you remove obvious dust quickly, keep your warranty intact, and spend more time shooting than retouching.
FAQ
Will cleaning my sensor at home void the warranty
Using proper tools such as a hand blower, purpose made swabs, and approved sensor cleaning fluid generally does not void a camera warranty, because you are performing normal maintenance on the external cover glass rather than opening the body. Damage caused by misuse, such as scratching the sensor cover or spilling household chemicals inside the camera, is usually not covered. Always read your manufacturer’s warranty terms and follow their recommended method before starting.
How do I know if the spots come from the lens or the sensor
Shoot a defocused image of a plain surface at around f/16, then take several frames while slowly panning the camera. If the spots stay in exactly the same place in every image, the sensor is dirty, while marks that move or change shape usually come from the lens or filter. Viewfinder only specks that never appear in photos indicate dust on the mirror or focusing screen in a DSLR.
Is a rocket blower enough, or do I need wet swabs
A rocket style hand blower is often enough for fresh, dry dust, especially if you clean the sensor soon after shooting in a dusty environment. When spots survive several careful blower sessions or look like smeared blobs, you probably need wet swabs and sensor cleaning fluid to remove sticky contamination. Many photographers start with a blower every time and reserve wet cleaning for occasional deeper maintenance.
How often should I clean my camera sensor
There is no fixed schedule, because frequency depends on how and where you shoot. Studio photographers who rarely change lenses may go many months without visible dust, while outdoor shooters who swap lenses on beaches or trails might need a quick blower session after every trip. Use the white wall test whenever you notice new spots in skies or smooth backgrounds, and clean only when those marks become visible in real images.
Can I use regular glass cleaner or lens wipes on the sensor
Household glass cleaners and generic lens wipes are not safe for sensor cleaning, because they often contain detergents, fragrances, or moisturizers that leave residue on the coated sensor cover glass. These additives can create streaks that are harder to remove than the original dust. Always use solutions and swabs specifically designed for camera sensor surfaces to protect both image quality and warranty coverage.