Understanding the aurora borealis phenomenon
Delving into the Celestial Dance of Aurora Borealis
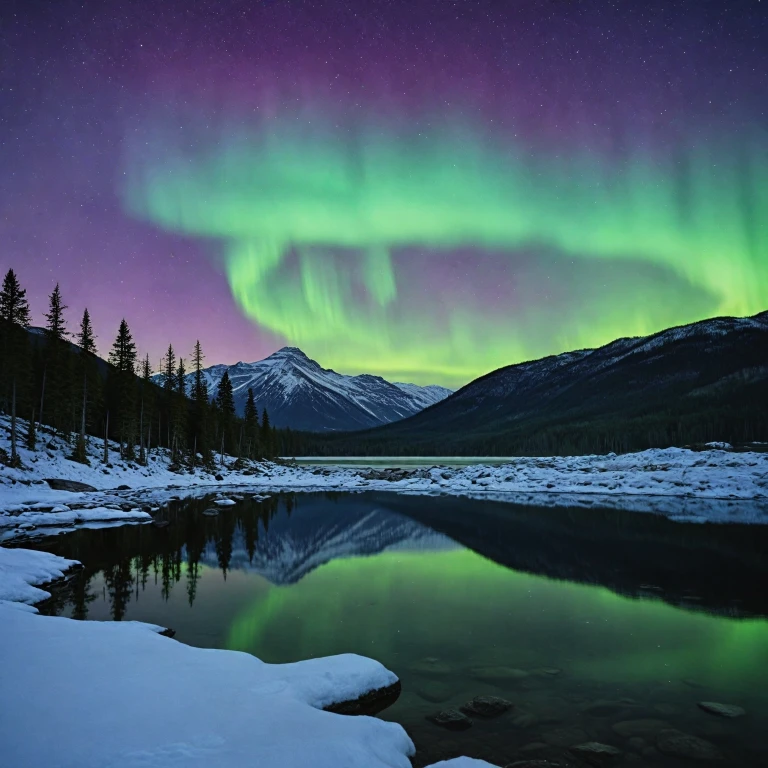
When it comes to capturing the captivating dance of the aurora borealis, understanding the phenomenon itself is half the art of lights photography. The aurora, colloquially known as the northern lights, is a mesmerizing natural spectacle that occurs when charged particles from the sun interact with the Earth's magnetic field, creating vibrant light displays in the night sky. To photograph northern lights effectively, timing and location are crucial. Pay close attention to the aurora forecast, as this will guide your planning and make sure you're ready with your camera settings when the moment arrives. The best seasons to witness the northern lights usually fall between late September to early April in the northern regions where the daylight hours are shorter, lending more time to explore the night sky. Environmental factors significantly influence lights aurora photos. Low light pollution areas offer the best ambiance for capturing the natural beauty of the aurora borealis. The less interference from artificial lighting, the more vivid your pictures northern lights will be. You may find that using a tripod is essential for keeping your camera steady, as this allows for longer exposure times without the blurry outcomes from shaky hand-held shots. For those new to night photography or looking to sharpen their skills, understanding the basics of how different settings, such as ISO settings, shutter speed, and white balance, function together can dramatically enhance your final shots. Many photographers, even if they are iPhone users relying on a camera app, see a significant improvement in their final photos by tweaking these elements. If you're keen to explore further, incorporating graduated ND filters can help balance exposure and enhance your lights photography, allowing for more stunning captures in various lighting conditions. For related insights, check out this guide on enhancing sunset photography with filters, as similar principles apply when photographing the grandeur of auroras.Choosing the right digital camera for night photography
Selecting the Best Photography Equipment for Nighttime Wonders
Choosing the right digital camera is crucial for capturing the magnificent aurora borealis. To effectively photograph northern lights, consider investing in a full-frame digital camera. These cameras generally offer excellent performance in low light conditions due to their larger sensor size, which allows more light to enter. A mirrorless model, known for its quiet shutter, can further enhance your experience.
When it comes to camera settings, those equipped with manual mode options will provide the flexibility needed for night photography. Look for models that offer extensive ISO settings and exposure time adjustments, two features essential for achieving the best pictures of northern lights. Brands renowned for their high-quality sensors and swift processing capabilities are worth considering if you aim to get the best photos of the dazzling night sky.
If you’re using something less conventional, like an iPhone, opt for later models that have advanced night mode capabilities. While not as robust as full-frame cameras, with the right settings adjustments and a firm tripod, they can still yield stunning lights photography.
For those in pursuit of precision and enhanced images, the choice of lens also plays an integral role. A wide-angle lens is often recommended due to its ability to capture more of the sky in a single frame, minimizing the distortion. Coupling this with an adjustable aperture will help gather optimal light for each shot.
Another detail to factor in is the shutter speed. To photograph northern lights, a shutter speed ranging from a few seconds up to 20 seconds might be necessary. This allows your camera to capture more light from the aurora borealis display.
Finally, don’t underestimate the impact of light pollution. Although the northern lights are best seen in remote locations, consider using a graduated ND filter, which can help manage the brightness variations in the sky. For more insights on how to choose the right filter, refer to this guide.
Essential camera settings for aurora borealis
Optimizing Your Camera for Northern Lights Photography
Capturing the mesmerizing dance of the aurora borealis on your camera requires more than just ‘point and shoot’. To harness the vibrant hues and subtle nuances of the night sky, you need to fine-tune your camera settings. These settings are crucial in ensuring that your night photography brings out the best of what the northern lights have to offer.
- ISO Settings: Start with an ISO setting of 800 or 1600. This helps you capture more light without introducing too much noise into your photos. However, balance is key, as higher ISO might compromise the picture quality.
- Shutter Speed: A shutter speed ranging from 5 to 25 seconds often yields the best results. A longer exposure time allows your camera sensor to capture the bright glow of the aurora against the dim night sky. Adjust this speed based on light pollution levels and aurora intensity.
- Aperture: Wide apertures (such as f/2.8 or f/3.5) are more effective in low light conditions and help you capture the vivid colors and details of the northern lights.
- White Balance: The auto white balance mode can be a good start. However, for best results, a manual adjustment that complements your ISO and shutter settings might be necessary.
Ensuring these camera settings are aligned properly with night mode will elevate your northern lights photography game. Consider using a camera app that provides the flexibility to adjust these settings, or explore the finer settings available on pro DSLR and mirrorless cameras.
To stabilize your camera and further enhance image quality, a sturdy tripod is indispensable in northern lights photography. Combined with a suitable lens, these settings and tools will make sure you photograph the northern lights in all their glory.
The role of lenses in capturing the Northern Lights
The Importance of Choosing the Right Lens
When it comes to photographing the northern lights, the lens you choose plays a crucial role in capturing the vibrant colors and dynamic movements of the aurora borealis. A high-quality lens can make a significant difference in your photos, especially in low light conditions.
Wide-Angle Lenses for Expansive Views
For capturing the expansive night sky and the sweeping arcs of the northern lights, a wide-angle lens is your best bet. These lenses allow you to include more of the sky in your frame, which is essential when the aurora stretches across the horizon. Look for lenses with a focal length between 14mm and 24mm for optimal results.
Fast Aperture for Low Light Photography
In low light photography, having a lens with a fast aperture is beneficial. A lens with an aperture of f/2.8 or wider will let in more light, allowing you to use faster shutter speeds and lower ISO settings. This helps in reducing noise and capturing sharper images of the aurora borealis.
Prime vs. Zoom Lenses
While zoom lenses offer flexibility, prime lenses often provide better image quality and faster apertures. If you are serious about northern lights photography, investing in a good prime lens could be worthwhile. However, if versatility is a priority, a high-quality zoom lens with a wide aperture can also deliver excellent results.
Considerations for Lens Coatings
When photographing the aurora, light pollution can sometimes be an issue. Lenses with advanced coatings can help reduce glare and improve contrast, making your aurora photos clearer and more vibrant. Look for lenses with anti-reflective coatings to enhance your night photography experience.
In summary, selecting the right lens is a critical step in mastering the art of capturing the aurora borealis. By considering factors like focal length, aperture, and lens coatings, you can significantly improve your chances of taking stunning pictures of the northern lights.
Using tripods and other accessories for stability
Maximizing Stability with the Right Gear
When capturing the mesmerizing dance of the aurora borealis, stability is key. A reliable tripod will ensure your camera remains steady during long exposure times needed in low light conditions.
Choosing a Sturdy Tripod
- Look for tripods that offer sturdy builds to withstand windy conditions often found in northern regions.
- Consider options made of carbon fiber for portability without sacrificing stability.
- Ensure the tripod permits flexible positioning and height adjustments for shooting at different angles of the sky.
Accessories for Enhanced Stability
Other accessories such as remote shutters or intervalometers play a significant role in improving image quality by reducing camera shake. These tools allow you to control your camera settings without touching the device during lights photography.
- Remote Shutters: Minimize vibrations when pressing the shutter button, preserving the crisp details of the northern lights.
- Intervalometers: Perfect for capturing time-lapse sequences of the shifting aurora, these devices automate shooting intervals.
Considerations for Your Camera Gear
When setting up equipment for photographing northern lights, it's beneficial to use additional support like sandbags to secure your tripod, especially on uneven terrain. Also, ensure your camera is acclimated to frigid outdoor temperatures to prevent fogging of the lens.
While a sturdy tripod and additional accessories won't guarantee perfect shots alone, they provide a solid foundation for your night photography pursuits. Combined with the right camera settings and a good understanding of the aurora borealis, these tools will significantly enhance your ability to capture breathtaking images of the northern sky.